Python Scripting - Maya Camera Projection UI
Final script avaible at the bottom of the page.
My initial idea for the project is to create a script that sets up a lot of the node connections needed for a camera projection as well as connecting it to a surface shader so that the user can place it on specific pieces of geometry.
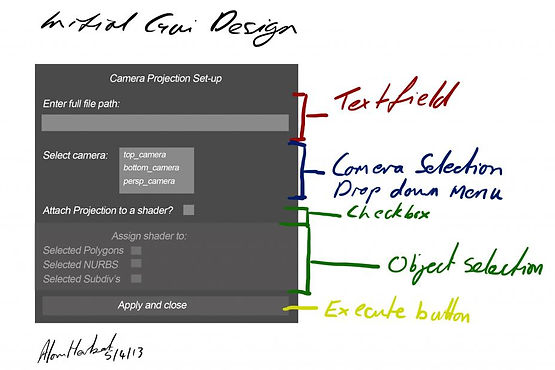
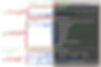
This was my initial GUI layout:

Scripting the Geometry Selection and Assigning a Shader
I started building the rough out line of the code.
I thought it was best to start with scripting how the user could select the geometry that they wanted before assigning the surface shader to it. Once the shader was created and assigned all i'd have to do is connect all the other nodes and link to a camera.
I found this a useful point to start trying to write a script.
After a few attempts i couldn't get it to work for me efficiently, but i had started to think of a simular method.

Separating the Geometry
I liked the idea of separating out the Polys, NURBS and Subdiv objects as it would allow the use to quickly select blocks of geometry without worrying about assigning the projection to some obscure object like a particle and assigning a shader to it as i'm sure this would throw up an error.
So what i did was also build in a deselection of everything the user had selected before clicking to run the script.
This is a basic UI made from maya.cmds. I quickly built it to check that the script worked, but I like the idea of the check boxes as it ment the user didn't have to enter any text which is a pain to check. Also the checkboxes toggle the selectType "in real-time". What i mean by this is that the suer can turn the checkbox state can be toggled on and off without refreshing the script.

Issues and Fixes
-I had a promlem right at the beginning where i didn't know how to select only poly gon objects. I was going to have the user select all the geometry and then apply a filter to the list of objects that they had selected.
However doing it this way would have confused the user if he was trying to project onto a NURBS object and wasn't getting any results as at no point would they know there was a filter.
-Another problem, and one that i haven't resolved yet is the way the checkboxes toggle the states of the selection tool. I feel uncomfortable having so many functions as i don't think its a very efficient piece of code, but it does do the job. I think that using a 'NOT' function to invert the state would be a better process.
-When a the "assign shader" button is pressed it creates a surface shader, however if you keep pressing the button it just keep making new surface shaders. I think what i might do is make it the last button so that when its clicked the selection is final and the window closes.
Further Development
However the way that the script worked was that once the user had selected their objects it would store them in a list and then the shader would iterate through the list applying the shader to each of items. But if the user didn't select any objects and pressed the "Apply and Close" button the script would still create a shader which wouldn't be needed.
To make this more efficient i used and "IF" loop which looked at the length of the list. If the list was less than or equal to 1 then it would apply the shader to the items in the list, else i just did a "pass".
Camera Selection
I personally found this section the hardest.
Originally i had planned on having a drop down menu, but I couldn't find any functions that did this in pymel so I think its something that needs to be done with either TKinter or pyQt.
So instead of a drop down menu i've settled for radio buttons.
My plan with the radio buttons is to:
-Use a for loop to create radio buttons for every item in the list.
-Create a new list of the radio buttons
-Use a "IF" loop to get a value= True of the button that has been selected
-Return name of Button (which is the same as the camera selected)
However I came into problems when i tried to find out which of the buttons had been selected.
I also discovered that when creating several radio buttons you need to create them into a radioCollection. this is so that they can been grouped together on the window.
I found that i was doing a couple of things wrong. I didn't realise that there was a different node that you had to use to get the state of the buttons (true or false). I was trying to use ".getValue()" like you would on a checkbox, when i should have been using ".getSelect()".
My tutor, Dan, showed me how i could pass data using callbacks.
what we did here was create a new list called myList. The "FOR" loop would run and the radio button "i" that was getting created was getting stored into a list called myList. at the end of the loop the list would append with "myList.append(i)".
Once the user has run the script and selected the camera and presses the button, a command is executed. the command uses a callback sending the list of camera names in myList through as an argument to the function called projCam. The argument is essentially unpacked into another list, radioList. using a For loop this list can be iterated through getting the values of the radioButtons using "each.getSelect()". If the value is false the the it simply passes to the next value in the list. If the vaule is true I then get the name of the camera it came from using the ".getLabel()". i can use this camera name that i retrive to search for the camera and duplicate it. Below is a copy of the script. It also has a checkbox which can turn on or off the option to copy the keyframes and other attributes of the orginal camera if the user wants.
'''
Author: Alan John Herbert
SECTION 2: Camera Selection and Duplication
2.3.0
'''
import pymel.core as pm
pm.window()
pm.frameLayout('Select Camera')
pm.columnLayout()
def projCam(*args):
radioList = args[0]
#itterate through list to find option selected true
for each in radioList:
if each.getSelect() == False:
pass
else:
#duplicating a camera that has the same name as the button
global cameraName
cameraName=each.getLabel()
#state of checkbox effects the copying of animtion keys on camera
copyState=copyChkBox.getValue()
pm.duplicate(cameraName, un=copyState, smartTransform=False, name='Projection')
print cameraName
#defining the window
#copyChkBox=pm.checkBox(label='duplicate keyframes', onCommand='toggleCopyKeysOn()', offCommand='toggleCopyKeysOff()')
#checkbox effects the copying of cmarea animation keys
pm.text('Select camera to duplicate and project from: ')
obj = pm.radioCollection()
#list all cameras in scene
cameraList=pm.ls(type='camera')
myList = []
for i in cameraList:
print i
#put radiobuttons into a list to itterate through?
i = pm.radioButton(i,label=i)
myList.append(i)
#i.setValue(True)
copyChkBox=pm.checkBox(label='DUPLIACTE KEYFRAMES')
pm.button(label='Create', command= pm.Callback(projCam, myList ) )
pm.setParent('..')
pm.setParent('..')
pm.showWindow()
Text Field and Image Path
I found scripting the textfield a tricky part of the script as i struggled to retrieve data from the textfield. I didn't know what tags to use, or method that would call the string in te text field.
But whilst I couldn't work out the textfield issue I worked on the next section of the this part which was to create and set up all the node connections for doing a projection.To do this i set up the projection up manually and then copied the MEL script that it produced. MEL is a bit different to python so i had to rearrange the syntax.
connectAttr -f place2dTexture1.coverage file1.coverage;
Became:
pm.connectAttr('place2dTexture1.coverage','file1.coverage')
To then load the file path that the user had entered i needed to know where it connected to the node, again i did it manually and got:

Further Development
I created a text field and made an instance of it called imagePath. Once i new that there were different nodes for retrieving information from the various UI elements i had to search a little bit on the pymel website until i came across, ".getText()". This allowed me to retrive what the user had entered into the field.
when the function was called to get the text i had to send the instance of the textfield through as an argument which was called imagePath.
path= imagePath.getText()
path now had the string that the user had entered into the textfield.
originally i tried an if statement, but i was having with when an error occurred because the image path was incorrect.
My tutor, Dan again suggested that i tried using exception handeling using a "try" statement.
I thought that if an error occurred it would be best to show an eror message to the user so they new what the problem was and then close the whole UI, aborting the projection set up. this is so that none of the nodes would be created as redundant nodes.
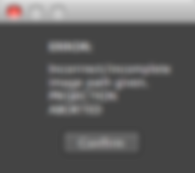
I used an information box that displayed the message:
pm.informBox(title='ERROR:', message='Incorrrect/incomplete image path given. PROJECTION ABORTED ', ok='Confirm')
Mostly the script ran fine as long as there were no other nodes in the scene.
what maya does when it creates a file node it automatically incriments its number to the next avaible one if there are multiple file nodes in the scene. This action doesn't appear in MEL script and so i was quite confunsed about how i could run the script several times in one scene and have all the node connect up properly each time.
what happens here is that that 'file' actually means file1 or file2 ect. So if a variable was man so that each time a new file node was created, its actual name would be stored in the variable.
fileName = pm.shadingNode('file',asTexture=True)
This wasn't just a problem for the file node, but all of them.
This variable name can then be inserted into the "connectAttr()" statement and concatenated with the attribute name for the node.
for example:
pm.connectAttr(twoDTexture + '.translateFrame', fileName + '.translateFrame')
pm.window()
def findFile(imagePath):
path=imagePath.getText()
try:
with open(path):
#creates nodes, their names upoon createtion are stored in variables that can be concatenated
fileName = pm.shadingNode('file',asTexture=True)
twoDTexture = pm.shadingNode('place2dTexture',asUtility=True)
threeDTexture = pm.shadingNode('place3dTexture',asUtility=True)
projection = pm.shadingNode('projection',asTexture=True)
#connections between the 2d placement and image file node
pm.connectAttr(twoDTexture + '.coverage',fileName + '.coverage')
pm.connectAttr(twoDTexture + '.translateFrame', fileName + '.translateFrame')
pm.connectAttr(twoDTexture + '.rotateFrame', fileName +'.rotateFrame')
pm.connectAttr(twoDTexture + '.mirrorU', fileName +'.mirrorU')
pm.connectAttr(twoDTexture + '.mirrorV',fileName +'.mirrorV')
pm.connectAttr(twoDTexture + '.stagger', fileName +'.stagger')
pm.connectAttr(twoDTexture + '.wrapU', fileName +'.wrapU')
pm.connectAttr(twoDTexture + '.wrapV', fileName +'.wrapV')
pm.connectAttr(twoDTexture + '.repeatUV', fileName +'.repeatUV')
pm.connectAttr(twoDTexture + '.offset', fileName +'.offset')
pm.connectAttr(twoDTexture + '.rotateUV', fileName +'.rotateUV')
pm.connectAttr(twoDTexture + '.noiseUV', fileName +'.noiseUV')
pm.connectAttr(twoDTexture + '.vertexUvOne', fileName +'.vertexUvOne')
pm.connectAttr(twoDTexture + '.vertexUvTwo', fileName +'.vertexUvTwo')
pm.connectAttr(twoDTexture + '.vertexUvThree', fileName +'.vertexUvThree')
pm.connectAttr(twoDTexture + '.vertexCameraOne', fileName +'.vertexCameraOne')
pm.connectAttr(twoDTexture + '.outUV', fileName +'.uv')
pm.connectAttr(twoDTexture + '.outUvFilterSize', fileName +'.uvFilterSize')
#conections between image file and projection node
pm.connectAttr(fileName + '.outColor','projection1.image')
#conections between place3DTexture and projection node
pm.connectAttr(threeDTexture + '.worldInverseMatrix[0]',projection + '.placementMatrix')
#connecting a image file into the fle node
pm.setAttr(fileName + '.fileTextureName',path)
#setting projection type from default plannar to perspective
pm.setAttr(projection + '.projType', 8)
#if maya gets an error from an incorrect image path do:
except IOError:
pm.informBox(title='ERROR:', message='Incorrrect/incomplete image path given. PROJECTION ABORTED ', ok='Confirm')
pm.selectType(allObjects= True, polymesh=True,nurbsSurface=True,subdiv=True)
pm.deleteUI(mainWin, window=True)
#main window
mainWin=mc.window(title = "Camera Projection",)
#main layout of window
pm.frameLayout(label='Image Path')
#sublayout within the famelayout style
pm.columnLayout()
#pm.button(label='kill', command='findFile(imagePath)')
pm.text("Please enter full path name of image to project: ")
imagePath=pm.textField()
#set parrent means that anything betweent he last define layout and this point follows that layout.
pm.setParent('..')
#second set parent means that the layout on the main window have to follow a predefined layout.
pm.setParent('..')
pm.showWindow()
Merging the Scripts
I thought that it would be simple at the end merging the scripts and building a UI. when merging the scripts i came across a few errors that needed sorting out.
Building the UI
The finished UI looks quite different to my original intention. I feel that I haven't adapted its general layout too much, but working out that you can have layouts that are within others layouts made organising the sections much clearer on what their specific functions did.
I wanted it to be simple, but with some information to guide the user through what input they needed to enter into each of the sections.
As the project developed I thought of new features that the users might find useful or ways to keep the UI tidy, for example grey-ing out checkboxes that the user was not intending on using.
The frame layout gave good clear sections, to break the options down into. I could also have a title at the top of each section to give a breif idea of what exactly that set of options would be controlling.
When I started with the layout outs the only one that i really knew was "pm.columnLayout()". What this did was layout out everything on a separate line. That is sort of what i wanted, a order i which the user should interact with the UI. However i wanted the sections to be better separated so that it was clear to the user. Playing around with the different layouts gave me some interesting results, but it wasn't until i found this referance from the pymel website that i realised that you could have layouts within layouts.
The first "pm.setParent" means that anything between the last defined layout and this point follows that layout.
The second "pm.setParent" means that the layout on the main window have to follow a predefined layout.
Closing the UI
I thought to save the users screen from getting clogged up with UI windows i'd try and close them after the user has used them.
I have added the feature on closing the UI when an erorr occurs with the image path not being recognised and the user clicks the "confirm" button on the error message window.
I have also made it so that the window closes after the user has clicked "apply and close" as this calls the same function to close the window as when the error occurs.
However I thought that if for some reason if the UI window doesn't close because the script has failed in some aspect, that should only ever be one instance of it. The stops the users window from getting clogged up and messing up the data of its in mid flow through a script.
I used the same code as from my Tutor, Dan's video tutorial.
The window has to be a global variable, upon the user clicking the button to run the script, one of the first thing that should be at the top of the script is this code.
It tries to close a window called "mainWin", but if it can't find it or it doesn't exist then carry on with the rest of the script.
Finishing the Code
I still had parts of the code that i needed to finish. I had to get the camera to connect to the surface shader. "IF" the user selects the "do you want to apply a shader?" checkbox, look at the mount of objects in the list. If list is more than or equal to 1 then create a shader and apply it to everything in the list.
Final Script
I've worked most of the major kinks out for the final script. Theres still a few issues that i think can be developed over time.
This is a run through introducing the GUI and explain a bit how the script works.
In my scene i have just a polygon box and a camera, nothing else.

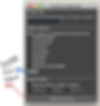
Upon running the script a little GUI appears at the same time anything that the user had selected has been deselected and are currently unable to select anything in the scene.

The top field is for the user top input the file path of the image that they want to project.
If the user forgets to input the path or enters a wrong one they'll encounter an error message.
after clicking the 'conform on the error message' the projection with be aborted and the GUI will close.
The second field is for the user to select the Camera that they want to duplicate and them project the image from the new duplicated camera. the user also has the option of copying all of the attributes of the original camera by selecting the checkbox.
The third and final field is if the user wants to assign a shader to that the projection. this is optional and won't create or attempt any connections if the user hasn't selected any objects.
The greyed out options can be accessed by selecting the checkbox "apply shader?" at which point those checkboxes become available. the three different checkboxes are to control the selectType command that affects the selection function. This stops the user form trying to project or assign a shader to anything that would then cause an error.
The User regains their full select-ability once they've clicked the "Apply and Close" button, at which point the various node are created and connections made as well as the GUI closing its self.
The node in the hypershade show that all the conncetions worked fine after the user has set up a projection with the script and that only one camera has been created and renamed Projcetion sen in the outliner.

Quick render of the image I projected:

Evaluation
There are still quite a few big problems with my script, but i am very pleased to have a working version that actually can achieve something. I've had some, but not much experience before this scripting from college so i was familiar with some of the principals like what a variable was, lists, dictionary, loops, tuples, functions and GUI's. But that was quite a while ago and so i have found this module a challenge with getting to grips with how data can be passed to various functions and expressions.
I think that this project suited my level of capability well, as i never really felt out of depth with the coding, but to produce something more complicated would have taken me much longer.
I think i approached this project in quite a logical way and that i broke the sections down was a good way of scripting this process as it makes it more modular and easier for possible updates.
Below i've stated some of the issues i found with the script, most of them are little bugs that can be worked out in time.
Issues
There are still some issues that I haven't managed to find a solution for which have carried through into the final script.
-Projection doesn't work if the user doesn't apply a shader to the geometry. Allt he nodes are still created but the projection doesn't happen. I 'm that its not far off from working, the user might have to just finish the task off manually if thats the case. But the script does work when a shader is used.
-I had a problem to do with calling multiple functions from one command from clicking the "apply and close" button. I made another function which then called all the functions i needed to happen on the button click. However there was one which was a bit unusual in setting up.
This is the "create" camera Button. The reason i have it its separate button is that i was worried that putting it inside another function it would have problems passing data. This is probably something can can be fixed but i left it like this so i had a working script.
-When no camera is selected the script fails producing this error in the command line:
# Error: RuntimeError: file /Applications/Autodesk/maya2013/Maya.app/Contents/Frameworks/Python.framework/Versions/Current/lib/python2.6/site-packages/pymel/internal/pmcmds.py line 134: 'projection1.image' already has an incoming connection from 'file2.outColor'. #
However the GUI doesn't close so the user can attampt it again.
Bibilography
-Maya Python: For Games and Film by Adam Mechtley/Ryan Trowbridge
-Digital Tutors Course: Python Scripting in Maya by Sunder Iyer
http://www.digitaltutors.com/tutorial/3 ... ng-in-Maya
-Pymel website:
http://pymel.googlecode.com/svn/docs/index.html
'''
Final ScriptV6
Authour: Alan John Herbert
Scripting For VFX Assignment
Staffordshire University
Camera Projection Setup
SECTION 1: Node Connections
Version 1.0.1
'''
import pymel.core as pm
import maya.cmds as mc
#very last function called when clicking "Apply and close"-closes window and restores full selectability
def closeWindow():
#i found that i was getting errors depending where this connnectAttr line was, for some reason it works fine here.
pm.connectAttr(cameraName + '.message', projection + '.linkedCamera')
pm.selectType(allObjects= True, polymesh=True,nurbsSurface=True,subdiv=True)
pm.deleteUI(mainWin, window=True)
#this function is called whent he button is pressed. multiple executed on one command.
def functCaller():
#polyselection needs to be defined before it can be used, thats why its in this function
global polySelection
polySelection = pm.ls(sl=True, objectsOnly=True)
findFile(imagePath)
SpecificGeo(polySelection)
closeWindow()
#if a instance of the window (mainWin) exists it shall be deleted/can't find it existing then a new one is made
#referance: uni tutor video tutorials
global mainwWin
try:
pm.deleteUI(mainWin, window=True)
except:
pass
#defining the function to get data form text field
def findFile(imagePath):
path=imagePath.getText()
try:
with open(path):
#creates nodes, their names upoon createtion are stored in variables that can be concatenated
fileName = pm.shadingNode('file',asTexture=True)
twoDTexture = pm.shadingNode('place2dTexture',asUtility=True)
threeDTexture = pm.shadingNode('place3dTexture',asUtility=True)
projection = pm.shadingNode('projection',asTexture=True)
#connections between the 2d placement and image file node
pm.connectAttr(twoDTexture + '.coverage',fileName + '.coverage')
pm.connectAttr(twoDTexture + '.translateFrame', fileName + '.translateFrame')
pm.connectAttr(twoDTexture + '.rotateFrame', fileName +'.rotateFrame')
pm.connectAttr(twoDTexture + '.mirrorU', fileName +'.mirrorU')
pm.connectAttr(twoDTexture + '.mirrorV',fileName +'.mirrorV')
pm.connectAttr(twoDTexture + '.stagger', fileName +'.stagger')
pm.connectAttr(twoDTexture + '.wrapU', fileName +'.wrapU')
pm.connectAttr(twoDTexture + '.wrapV', fileName +'.wrapV')
pm.connectAttr(twoDTexture + '.repeatUV', fileName +'.repeatUV')
pm.connectAttr(twoDTexture + '.offset', fileName +'.offset')
pm.connectAttr(twoDTexture + '.rotateUV', fileName +'.rotateUV')
pm.connectAttr(twoDTexture + '.noiseUV', fileName +'.noiseUV')
pm.connectAttr(twoDTexture + '.vertexUvOne', fileName +'.vertexUvOne')
pm.connectAttr(twoDTexture + '.vertexUvTwo', fileName +'.vertexUvTwo')
pm.connectAttr(twoDTexture + '.vertexUvThree', fileName +'.vertexUvThree')
pm.connectAttr(twoDTexture + '.vertexCameraOne', fileName +'.vertexCameraOne')
pm.connectAttr(twoDTexture + '.outUV', fileName +'.uv')
pm.connectAttr(twoDTexture + '.outUvFilterSize', fileName +'.uvFilterSize')
#conections between image file and projection node
pm.connectAttr(fileName + '.outColor','projection1.image')
#conections between place3DTexture and projection node
pm.connectAttr(threeDTexture + '.worldInverseMatrix[0]',projection + '.placementMatrix')
#connecting a image file into the fle node
pm.setAttr(fileName + '.fileTextureName',path)
#setting projection type from default plannar to perspective
pm.setAttr(projection + '.projType', 8)
#if maya gets an error from an incorrect image path do:
except IOError:
pm.informBox(title='ERROR:', message='Incorrrect/incomplete image path given. PROJECTION ABORTED ', ok='Confirm')
pm.selectType(allObjects= True, polymesh=True,nurbsSurface=True,subdiv=True)
pm.deleteUI(mainWin, window=True)
#main window
mainWin=mc.window(title = "Camera Projection",)
#main layout of window
pm.frameLayout(label='Image Path')
#sublayout within the famelayout style
pm.columnLayout()
#pm.button(label='kill', command='findFile(imagePath)')
pm.text("Please enter full path name of image to project: ")
imagePath=pm.textField()
#set parrent means that anything betweent he last define layout and this point follows that layout.
pm.setParent('..')
#second set parent means that the layout on the main window have to follow a predefined layout.
pm.setParent('..')
'''
END SECTION 1
'''
'''
Author: Alan John Herbert
SECTION 2: Camera Selection and Duplication
2.3.0
'''
#mainLayout for this section
pm.frameLayout('Select Camera')
#sub layout
pm.columnLayout()
def projCam(*args):
radioList = args[0]
#for loop itterates through list to find radioButton selected/true
for each in radioList:
if each.getSelect() == False:
pass
else:
#camera name variable is gloabl because it is refered outside of this function.
global cameraName
cameraName=each.getLabel()
#state of checkbox effects the copying of animtion keys on camera
copyState=copyChkBox.getValue()
#duplicating a camera that has the same name as the button
pm.duplicate(cameraName, un=copyState, smartTransform=False, name='Projection')
print cameraName
#text to guide user
pm.text('Select camera to duplicate and project from: ')
obj = pm.radioCollection()
#list all cameras in scene
cameraList=pm.ls(type='camera')
myList = []
for i in cameraList:
print i
#put radiobuttons into a list to itterate through
#"i" is the name of the camera
i = pm.radioButton(i,label=i)
myList.append(i)
#UI elements
copyChkBox=pm.checkBox(label='DUPLIACTE KEYFRAMES')
pm.button(label='Create', command= pm.Callback(projCam, myList ) )
#set parrent means that anything betweent he last define layout and this point follows that layout.
pm.setParent('..')
#second set parent means that the layout on the main window have to follow a predefined layout.
pm.setParent('..')
'''
END SECTION 2
'''
'''
Authour: Alan John Herbert
Scripting For VFX Assignment
Staffordshire University
Camera projection Setup
Version 3.2.1
'''
import pymel.core as pm
import maya.cmds as mc
#enable checkbox options
def enableBtns(state):
polys.setEnable(True)
nurbs.setEnable(True)
subdivs.setEnable(True)
return state
#function that disable checkboxes
def disableBtns(state):
polys.setEnable(False)
nurbs.setEnable(False)
subdivs.setEnable(False)
#defines the states for the "selectType command"
#COULD BE MORE EFFICEINT
def togglePolyOn():
pm.selectType(polymesh=True)
def togglePolyOff():
pm.selectType(polymesh=False)
def toggleNurbsOn():
pm.selectType(nurbsSurface=True)
def toggleNurbsOff():
pm.selectType(nurbsSurface=False)
def toggleSubdivOn():
pm.selectType(subdiv=True)
def toggleSubdivOff():
pm.selectType(subdiv=False)
def SpecificGeo(*args):
#polySelection is a gloabl variable becuse it is used outside of this function
global polySelection
#the number of items in the list
lengthOList = len(polySelection)
print lengthOList
#if list has one or more objects do:
if lengthOList >= 1:
#creating the surface shader node for the projection and connecting it
projectionShader = pm.shadingNode('surfaceShader', asShader = True, n = 'projectionShader')
pm.sets(r= True, nss = True, em = True, n = 'projectionShader')
pm.connectAttr(projection + '.outColor', projectionShader + '.outColor')
#assigns Projection shader to selcted
for a in polySelection:
print polySelection
pm.select(a)
pm.hyperShade(assign='projectionShader')
else:
pass
pm.frameLayout(label='Apply Shader')
#defining the mian layout for this section
pm.columnLayout()
#checkbox that toggles the state of the other checkboxes
applyShader=pm.checkBox('o',label='would you like to apply a shader?', onCommand="enableBtns(state)", offCommand= "disableBtns(state)", value=False)
state=applyShader.getValue()
#defining sublayout to anything below line 240
layout=pm.horizontalLayout()
#user can choose via tick box, what geomatry they want to project on to.
polys=pm.checkBox('p',label="polygons", onCommand="togglePolyOn()",offCommand="togglePolyOff()")
nurbs=pm.checkBox('n',label="NURBS", onCommand="toggleNurbsOn()",offCommand="toggleNurbsOff()")
subdivs=pm.checkBox('s',label="Subdiv's", onCommand="toggleSubdivOn()",offCommand="toggleSubdivOff()")
#setting intail state of the selectType command
pm.selectType(allObjects= False, polymesh=False,nurbsSurface=False,subdiv=False)
#deselect previous user selection and apply selction mask so that only required objects are projected on to.
pm.select(deselect=True)
polys.setEnable(False)
nurbs.setEnable(False)
subdivs.setEnable(False)
#gives each of the buttons equal space depending on the size of window.
layout.redistribute()
pm.setParent('..')
pm.setParent('..')
#button will call the functions on command.
pm.button(label='Apply and Close', command= 'functCaller()')
# "closeWindow()"
pm.showWindow()
'''
END SECTION 3
'''